Storyboard
Storyboard Template
Where does a great story start? Undoubtedly, in someone’s mind. However, whether it ends up as a great video or movie includes many stages and one of them is storyboarding.
Creators need to explain themselves to the world, mainly stakeholders, and the team involved in order to get started. A storyboard also helps them to understand their intent better too because brainstorming and creation are never easy to understand, even for those who create.
Very often, the time from the moment the idea was born to the moment it needs to be presented is very short. In this case, a ready-to-use storyboard template will come in handy. Besides that, utilizing storyboard templates saves creators time they can devote to exploring characters, thinking about plots, developing unexpected situations, etc.
In other words, a storyboard template is a great way to ease the process that is hard and requires effort, creativity, talent, self-criticism, and millions of different skills.
The xTiles Storyboard Template may serve as a tool for quick and comprehensive sketching of your future videos. Additionally, we offer a quick guide on what a storyboard is, how to create one, and provide an example of a storyboard to show you what to expect in practice.
What is a storyboard?
A storyboard definition may be already known to you from the name itself. It is a vital tool in the process of creating a video, serving as a graphic representation and roadmap for how the video will unfold, shot by shot. It provides a visual outline of the scenes, depicting each shot with illustrations or pictures, accompanied by notes describing the actions and dialogue taking place in the script during that particular shot. Essentially, a storyboard can be likened to a comic book version of your video script.
By utilizing a storyboard, you gain a comprehensive plan and direction for your video production. Similar to a script, it visually guides you throughout the entire process, enabling you to effectively plan and execute the necessary shots when filming commences. Early on, you can seek feedback from others and easily make adjustments to your storyboard, avoiding significant changes during the filming stage.
Creating a compelling storyboard doesn’t require advanced artistic skills, although they can certainly enhance visual representation. Storyboards can range from rough sketches resembling comic book panels to simple stick figures or even computer-generated drawings.
By familiarizing yourself with various storyboarding methods, you can choose the approach that best suits your needs.
Understanding the essential elements of every storyboard is crucial. These elements include capturing the key scenes, shot compositions, camera movements, character positions, and any important props or visual details necessary for conveying the desired message effectively.
Additionally, there are popular storyboarding methods that offer a systematic approach. Two such methods include:
- The traditional storyboarding method involves creating a sequence of squares, each representing a shot, and placing illustrations or images within them. Below each square, you can provide annotations or descriptions detailing the actions and dialogue occurring in that shot. Traditional storyboarding allows for a linear visualization of the video, ensuring a smooth flow and coherence.
- Thumbnail storyboarding involves creating small thumbnail sketches or rough drawings of each shot arranged in sequence. These thumbnails offer a quick overview of the visual composition and help in mapping out the progression of the video. They are especially useful for rapidly generating ideas and exploring different shot options.
No matter what is the budget of your project or how highly you’re skilled, a well-crafted storyboard will be your clear and organized roadmap to seamlessly guide you through the production process. It empowers creators to bring their unique vision to life and ensures that their video aligns with the intended message and storytelling goals.
Why do creators need storyboards?
In the process of video production, creating a storyboard may initially seem like an additional step, but its importance should not be underestimated. Here are three compelling reasons why incorporating a storyboard is crucial:
- Best way to share your vision
Communicating and conveying your vision for the video can often be challenging, especially when relying solely on verbal explanations or written documents like scripts.
Stakeholders and team members may struggle to visualize your ideas accurately. However, with a storyboard, you can present a visual representation that precisely maps out the sequence and appearance of your video.
By showcasing the visuals, compositions, and flow of the video through the storyboard, you provide a tangible reference that significantly improves others’ understanding of your creative concept.
- Makes production much easier
Storyboarding serves as a blueprint for your video production, offering a comprehensive plan that encompasses all the necessary shots, their sequence, and the integration of visuals with the script. It acts as a starting point, guiding you in planning the coverage for each scene, including the different angles and perspectives to be captured.
This detailed roadmap greatly facilitates the production process by ensuring that no crucial scenes are overlooked and enabling you to piece together the footage according to your envisioned narrative.
- Saves you time:
Although creating a storyboard requires an initial investment of time, it ultimately saves time during the later stages of production. By having a visual representation of your video’s structure and key elements, you can effectively communicate your vision to your team, minimizing misunderstandings and the need for extensive revisions.
The storyboard streamlines the creation process by providing clarity and alignment, helping you stay focused on your original concept and reducing potential delays and iterations.
In summary, integrating a storyboard into your video production process enhances communication, streamlines production, and ultimately saves time. It enables you to effectively share your vision, facilitates planning and execution, and contributes to a smoother workflow, ensuring that your video aligns with your creative intentions while minimizing revisions and maximizing efficiency.
What is a storyboard template?
A storyboard template serves as a visual planning tool that aids in organizing and mapping out the key elements of a story, video, or animation. It typically consists of a series of boxes or frames that depict the sequence of events in the narrative, accompanied by space for written or visual notes to provide contextual details. By utilizing a storyboard template, you can streamline the creative process, making it easier to plan and visualize complex ideas effectively.
Storyboard templates hold significant importance as they contribute to the organization and structure of creative projects. They serve as a framework to plan and outline the visual progression of a story, ensuring that the desired message is conveyed coherently. These templates find applications in various domains, ranging from film and video production to marketing campaigns and educational initiatives.
Different video storyboard templates offer diverse approaches to presenting and organizing the narrative:
- Linear storyboards arrange the frames in a sequential order, enabling a straightforward representation of the story’s progression.
- Nonlinear storyboards utilize visual cues to demonstrate the relationships between different elements, allowing for a more dynamic and interconnected representation.
- Branching storyboards are employed to map out multiple possible paths or outcomes, while modular storyboards offer flexibility in arranging various components, facilitating easy rearrangement and experimentation.
Using a storyboard template for video offers several benefits throughout the creative process. Firstly, it saves time by providing a clear visual representation of the story or project, aiding in the efficient communication of ideas among team members. It allows stakeholders to grasp the creative vision more easily and provide relevant feedback. Secondly, a storyboard template helps identify potential issues or areas for improvement at an early stage, enabling necessary adjustments to be made before significant resources are allocated. This proactive approach minimizes the risk of wasted efforts and enhances the overall quality of the final output.
How to create a storyboard using the xTiles Storyboard Template?
The traditional approach involves sketching or drawing each frame on paper, arranging them in sequence to capture the flow of your video. This method allows for a hands-on, tactile experience, giving you the freedom to add annotations or notes alongside the images to provide additional context.
However, doing everything on paper might take a long time, and the process might get complicated if you need to edit some parts. The alternative – ready-to-use storyboard template and storyboard software and apps can be an efficient and much faster way to create a workable storyboard.
By providing creators with a ready structure where they can insert their data, a template shortens the time needed for storyboard creation, which means they have more time for creating the video itself. Also, when people are pressed for time and need to present their video intent urgently, such a template will come in handy as the shortest method for storyboarding.
Since we decided to use a template because many storyboard apps and software may require paid subscriptions, the first step of storyboarding – creating blank spaces is unnecessary. Everything is already done. Additionally, you can add more scenes or delete some if you need to, as the xTiles Storyboard Template is easily customizable.
When drafting your storyboard, it’s important not to worry about drawing skills because stick figures are enough in 9 out of 10 cases. Leave your skills and creativity to the actual video, yet don’t forget to add comprehensive accompanying text for each scene, which will help people visualize your intent more clearly and detailed. Context will eliminate the low level (if it’s low) of your drawings and in case you pour your heart into your sketches, it will help to create an even greater picture.
Also, it’s important to know that your drawings don’t have to be detailed or even in color. Even bad drawings, if they have a shared style, will present your intent. Your main task when sketching is to provide enough visual details so people who review your work can get the point.
Beneath each scene, you need to describe what is happening. Yes, that’s true. Your storyboard looks much like a comic book. That’s why it’s important to keep it simple, so anyone can understand and relate to what you’re trying to tell.
As you can see, employing a storyboard template enhances organization, facilitates communication, and promotes efficient planning and visualization of ideas. It optimizes the creative process by offering a tangible framework and serves as a valuable tool in identifying and addressing potential challenges during the early stages of a project.
Story Writing
Story Outline
All great books were story outlines at one time. Between a raw idea that suddenly comes to your mind and a finished text lies many pages of attempts, editing, rewriting from scratch, and a bit of frustration. A story outline helps you overcome that path easier and faster, and a story outline template brings you clearance and understanding of where to move.
Some people may consider story outlines as obstacles to their creativity. That misconception is popular due to the wrong understanding of a story outline and when a writer needs it.
Spur of the moment splash of creativity can’t be stopped or devastated by a plan. No writer must strictly follow the plan if they feel their story no longer matches the first intent. A story outline is a map to help you get to the finish safely while enjoying your road. However, you can change your place of arrival anytime you want.
Did you know that “Frankenstein” by Mary Shelley was originally intended to be a ghost story, but it ended up becoming a science fiction masterpiece that explores the dangers of playing God?
Did you know that J. D. Salinger initially intended to write a novel about a prep school teacher, but as he wrote, the focus shifted to the rebellious and angsty Holden Caulfield and his experiences navigating adolescence?
In other words, a story outline is here not to stop your writing or put it into a frame but to encourage and support you.
The xTiles Story Outline Template will help you quickly come up with the main points of your story, provide you with a clear overview of your intent, and save you time on preparation and planning so that you can rush into action.
Also, we offer you a story outline example and a detailed guide on how to write a story outline to help you create your own that may become a great story someday.
What is a story outline?
A story outline is a basic plan for a future story. It’s a roadmap that outlines the major events and plot points that will take place in the story.
Sometimes authors add characters, settings, and key elements to the story outline document. That helps to see and analyze the future story clearly on misconceptions, mistakes, deadends, etc.
The outline can be as detailed or as simple as the writer desires. However, the more complicated the story is planned, the more detailed plan an author needs to keep all details harmonized.
No story outline or its negligence might lead to confusion and mistakes in texts. If there is an editor or proofreader, they may find them and fix them. However, even professionals sometimes miss mistakes, and texts get published with inconsistencies.
For example, in his “Heart of Darkness,” Joseph Conrad accidentally changes the age of one of his characters from 32 to 38 and back again. Jane Austine, in ” Pride and Prejudice,” makes the same kind of mistake. Mr. Bennet says that he has been married for 23 years, but later on, it is revealed that he has been married for 24 years.
A story outline won’t protect you from all possible mistakes, but it will definitely minimize the appearance of such inconsistencies in your texts.
A story outline structure depends on the story itself and on the author’s way of planning. Usually, there are next sections:
- Introduction, where an author outlines the beginning of a story and where the main character or characters appear.
- Rising Action, where an author describes events that will build tension and raise problems to move the story forward.
- Climax, where tension reaches its highest point in the story, and the conflict gets resolved.
- Falling Action, where the events take place after the climax, leading to the logical resolution of the story.
- Conclusion, where the story ends, and the characters move on with their lives.
Not all stories can be put within that list. Literature has overcome a long path to ruin all the possible standards that might oppress people’s creativity. Hundreds of innovators spend years trying to show that there are no frames and cages to captivate real talent. It will find its way out via texts of bizarre and flamboyant forms.
That’s why the story outline method and story outline templates are just tools to coordinate your writing and keep you concentrated on your idea.
When does a writer need a story outline?
The safest option is to use a story outline for every fictional piece a writer is about to start writing. However, it may not be possible due to different reasons. For example, Ernest Shackleton wrote a book about his Antarctic expedition while stranded on an ice floe.
Some notable writers preferred or at least experimented occasionally with writing stories without a strict outline. Jack Kerouac famously wrote “On the Road” in a stream-of-consciousness style, without an outline or plan. Stephen King has said that he often begins writing a story with no clear plan or outline, letting the characters and plot develop as he goes.
Their experience may be alluring. However, skipping the planning and brainstorming stages is not always the best idea, especially when you’re new to writing.
If a novice writer wants to break stereotypes, they need to learn how to play by rules first, and outlining their stories before writing them will help to do it.
Traditional texts have their own rules and demand a certain structure. Usually, it’s a before-mentioned five-part structure with an introduction, rising action, climax, etc.
Unless you study literature, whether on your own or in college, you might not define those parts on your own. Without understanding how a text works, you might not build a story that will work for a reader.
Writing a story outline is important for a good beginning. Yet, you may do it at any stage of the writing process, depending on your individual approach, preferences, or current circumstances.
- At the planning stage, when you only begin your new writing project, you may find it helpful to create a story outline as a way to organize your thoughts and ideas, making it easier to develop the plot, characters, and settings.
- At the revision stage, when you review your existing draft, you may outline your story to identify areas that need improvement and find plot holes or weak characters or arcs.
- At the collaboration stage, when/if working with your co-writers or editors, you may create an outline to ensure that every participant is on the same page. It will ease your collaboration on a shared version by providing you with a clear understanding of the story’s structure and plot,
- Finally, you may outline your story to manage your time, whether you write in your free time or it’s your main job. An outline will help you understand how much time you will need to spend on each part of your text and plan it accordingly to your other activities so that no deadline will be missed.
Additionally, when breaking the story down into manageable chunks, writers can more easily track progress and set goals for themselves. That may be particularly useful for long writing projects, such as novels or screenplays.
Story outline templates
A story outline is a basic framework to make writing easier and more enjoyable without producing text with mistakes, inconsistencies, and holes.
A story outline template is the next step, making the process of writing an outline even more manageable. It will help you plan each part of your future story according to your initial idea and stick to it throughout the writing process.
Creating a document and taking care of its visual elements may be time-consuming. If there’s no option to organize everything as you like it, you may refuse the idea of using a story outline at all.
Also, poor customization functionality, like in the story outline template for Google Docs, might complicate the process of creating an outline.
xTiles offers an easily customizable story outline template that you can freely share with everyone on the internet and change whenever you want and need.
The ability to add and embed visual content allows you to create an outline representing your idea on different levels through different expressive means.
The xTiles Story Outline template may benefit writers in several ways:
- It helps to organize the story.
Every story detail is important, whether you’re writing a short story outline or an epic novel outline. And every detail has to have its own place to work in your story as you intended. A story outline template will help authors avoid being drawn into details, descriptions, twists, and information about characters and settings.
- It helps save time.
A template is a basic framework to build upon a story. Having a predefined structure, a template ensures a writer doesn’t miss important details.
- It helps adapt and modify a story if you change your intent.
Your story may change dozens of times until you finish it. Sometimes a story is so consuming that authors become led by it.
By the way, plots about creators who become consumed by their works are pretty popular. You may find that in Stephen King’s “Secret Window, Secret Garden,” where the protagonist becomes consumed by his writing and descends into madness as he struggles to complete his latest work, or in Philip Roth’s “The Ghost Writer,” where the protagonist becomes consumed by the story of his subject.
- It helps maintain consistency throughout a story.
A template helps to ensure that important elements, such as character traits and plot points, remain coherent and cohesive.
- It helps writers stay focused on the overall direction of the narrative and avoid getting sidetracked by tangents or irrelevant details.
As you write, your creativity continues to produce new ideas and details that may be important for your story development. However, you can’t put everything because some may cancel others and vice versa. A template will help you from getting astray.
Also, it’s a great place to note all your ideas that can’t be used in the current story but may make the next one interesting.
- It helps to identify potential problems with a story early on.
If you finished your story, and there were no challenges, no hard decisions, or no holes, you probably need to check it once again, especially if you didn’t outline your story before starting.
A template will help you see potential problems with the plot, characters, arcs, and characters and address them before they become more difficult to fix later on in the writing process.
However, you need to understand that you can’t protect your story from inconsistencies fully. The larger your story will be, the more you might miss. J. R. R. Tolkien revised and rewrote large portions of “The Lord of the Rings” over many years to address issues with plot and characterization. Margaret Mitchell reportedly rewrote the ending of “Gone with the Wind” multiple times before settling on the final version.
How to write a story outline?
Writing a story outline may be crucial for the writing process, as it helps writers to structure their stories and ensures that they will have clear and compelling narrative arcs.
Many authors don’t write a word of their next story without outlining it first. For example, J. K. Rowling is famous for her detailed outlines and planning processes in the Harry Potter series. She reportedly created extensive character profiles and plot outlines for each of the seven books before beginning to write.
Another famous author known for his well-planned plots and settings is George R. R. Martin. He creates extensive outlines and character profiles for his novels and has spoken about the challenges of balancing plot and character development throughout a long series.
Definitely, every author has their own style of writing and their own approach to planning writing. However, when you’re new to writing, you need to start with basic principles to build your own upon them.
The xTiles Story Outline Template allows you to create an outline to develop your story step-by-step. We also provide you with a guide and an example to make it easier. The sample is about Harry Potter and the Philosopher’s Stone, so there should be no problem understanding plot elements and how they work together.
Here are some general steps you may follow to write a story outline using our template:
- Start with basic information about your story. That section is particularly important if you work on a few stories simultaneously. It will help you easily switch between different plots, characters, and settings. Also, it will help to catch the needed vibe after long pauses.
Start with the name of your story. It may be just a working title that may change later. Try not to waste too much time creating a very eloquent name if there are no ideas. It may come to you naturally while working on the text.
Then shortly describe the settings. You may avoid details like landscapes. A geographical name may be enough to understand where the story takes place clearly.
Don’t forget about the time as it may be very important. 8 out of 10 times, inconsistencies we find in books concern timelines. Having it written down handy will help you keep in mind that you can’t deviate if it’s not a part of the story.
If your story takes place in a few different timelines, write down all of them. You may even add short descriptions to distinguish them better.
Finally, describe with a few adjectives the atmosphere of your story. It may change over the course of the action, so you may need to widen this part.
- Describe your story background. Tell a bit about your characters, how they ended up in the situation you’re about to describe, what they did before you decided to tell the world about them, etc.
That step may require previous research to understand where and when everything is happening. That will be easier if you want to write a sci-fi or fantasy book because you can make out most of the attributes of the setting world.
If you want your invented world to relate to your readers, you may need to use some cultures or historical periods as a base. For example, J. R. R. Tolkien used Celtic and Scandinavian mythologies when creating his Middle-earth, steampunk uses a Victorian Epoque, etc.
Historic stories require thorough research because each detail is hugely important. When an author mixes up the age of their characters, it represents a lack of attention. However, when they mix up historical details, it may be considered disrespectful to readers.
- Develop your future characters. If you get to know them better before you start, you will better understand them and their purposes over the course of the story.
Describe the most important point about them, how they look, and whether it has any effect on how they behave and how other people look at them. Think about whether they have some fears, what kind of music they like, what are their guilty pleasures, their first memory, etc.
Become friends with them or enemies. You need to feel something about your characters. This way, you will ensure your readers will consider them real people and not empty and flat profiles with no motivation and background.
Sometimes great characters become very significant parts of the culture. Think about Don Juan, Romeo & Juliet, Macbeth, Faust, etc. So, developing your characters is never a waste of time. After all, some tiny detail about them may become a game-changer in the whole story.
- List the central actions of the story scene by scene. Start with the introduction or inciting event.
Many writers concentrate on the first sentence or paragraph of their text too much, thinking that there’s no other chance to catch readers’ attention than to amuse or shock them from the beginning.
However, developing your first scene is much more important. Judging a book by its first sentence is even worse than judging it by its cover, and a rare reader will do that.
Also, remember that there has to be a smooth transition between scenes to make your story concise and coherent unless you plan to build it against traditional rules of storytelling.
- Finally, describe your story plot, its central conflict and what your characters are trying to resolve, what motivates them to do their job, etc.
That part is a quick summary of your story that helps you better understand your characters and how they feel inside your story.
By now, if you have followed the guide, you have at least a draft of your story outline. If it’s not perfect or far from what you wanted it to be, try again. This time you will have a base and previous experience to build an effective story outline.
Also, remember that your story outline isn’t engraved in stone. You’re free to edit and change it if you feel that your characters lead you in a different direction. Even film scenarios are often rewritten on the set because a team doesn’t relate to the previous draft anymore.
A story outline, even the most detailed one, might have holes because, in the beginning, when you write it, you might not have a clear understanding of the entire intent and what will happen at the end.
That’s why adding new information to both the text and the outline while working is important. In the end, when reviewing your text, it will be easier to check whether there are some inconsistencies.
Writing is always about attempts and mistakes. Great stories mean a great amount of work and life experience. So, when starting your story, be ready that it might be harder than you expected it to be and that you may start to dislike it after some time as you grow and develop as a personality and writer.
Story outline templates don’t resolve all problems writers usually face, yet they minimize their effect on writing, help organize the process, and work in the long run.
The xTiles Story Outline Template is a base for almost any kind of writing and story. However, it doesn’t stop you from implementing your wildest writing ideas because it’s customizable.
Social Media Digest
Social Media Calendar
Social Media Content Calendar Template
Success in social media depends on many factors, and thankfully, a lot depends on you. If you want to reach your target audience, your social media posts must be regular and planned. If you want your planning to be easy and seamless, you need to have a workspace built specifically for this task.
The xTiles Social Media Calendar Template is the perfect solution. It shortens the time a social media team needs to organize the planning routine, offers multiple tools to do it efficiently, and allows planning for different projects without a mess.
What is a social media calendar template?
A social media calendar template is a part of a social media management template suite. It’s a tool to assist in the content creation process from the moment content ideas flash upon your mind until the moment they take shape and are posted. It assists in building a social media presence in your industry by serving as a centralized workspace for a team that works on content.
Social media templates can’t effectively replace project management tools. It’s an element of your workflow for building an effective social media strategy and making it come true across different social media channels you decide to use.
However, a social media calendar can hardly be replaced by Google Sheets or Google Calendar because none of them are suitable for creating and implementing a content marketing strategy that can make a difference without forcing social media teams to struggle with all the rows, columns, and poor customization options.
The template is useful not only for planning upcoming social media posts. Social media managers and marketing teams can schedule, track, and optimize their content across various social media platforms using social media calendars. It also helps monitor and evaluate the content you post, its performance, and engagement data to inform future strategy updates.
It features a content calendar with planned social media updates, publication timetables, and content concepts to share on various social networks. Content calendars help marketers plan the social media updates for a particular week and ensure their content is well aligned to specific marketing campaigns or product offerings, enhancing engagement with the right audience.
A well-designed template helps a marketing team to communicate their content through multiple social media channels, such as Facebook, Instagram, Twitter, LinkedIn, etc. This centralized approach is useful to ensure that all the social media channels are consistent and, at the same time, have content that fits the specific site and its audience.
Another good thing about content calendar templates is that they are flexible and help all social media team members. For example, you can use it as an editorial calendar template if you’re responsible for reviewing the content before it gets posted. If a team uses the content calendar regularly, a social media manager can use it for a social media audit to evaluate the strong and weak points of their marketing efforts.
What are the benefits of a Social Media Calendar Template?
An effective social media calendar template brings many benefits for marketing teams and content creators.
What are the drawbacks of using a free social media marketing calendar template? None. While providing you with a centralized spot for turning your marketing efforts into results, it takes nothing in exchange.
Save time with the template
Time is a limited resource. A social media calendar template helps go faster through the content creation process, which is especially important when you have to work with something trendy at the moment.
By centralizing your social media strategy and posting schedule, you can streamline content creation. Especially when dealing with time-sensitive or trending topics that need to be responded to quickly.
Organization of the process
Organisation is another big one. A well-structured media content calendar keeps your social media marketing efforts across all platforms on track. You can plan and schedule posts in advance so content keeps flowing even when team members are away on holidays or other commitments.
Posting schedule
It also enhances long-term planning. You can schedule posts for as long as you need in case a team member responsible for social media content is on vacation.
Long-term planning becomes so much more manageable with a calendar template. You can plan your social media content weeks or even months in advance, in line with broader marketing campaigns and business objectives. This forward-thinking allows for better resource allocation and a balanced mix of content types.
Performance tracking
Performance tracking is also made easier. Many templates have sections for recording post metrics so you can see what content resonates with your audience. This data-driven approach helps you refine your social media strategy over time and achieve your marketing goals more effectively.
Features of use for different social media
Different social media platforms have their own rules, that’s why it’s important to tailor your social media calendar to each platform. A good media content calendar should account for these differences to get the most out of your social media posts across all platforms.
For this reason, the xTiles Social Media Content Calendar Template is flexible to suit your unique vision, your or your team’s way of working, and multiple platforms.
Here are a few examples of how to use the social media calendar template based on the social network you’re preparing a post for:
YouTube
For this video-centric platform, your social media calendar should focus on longer-form content, like very solid videos that cover the subject from A to Z. However, don’t forget about YouTube Shorts to convince people to try your content after a few-seconds video.
Plan for regular video uploads and consider optimal posting times and video length based on your audience analysis and what your competitors post.
On your social media planning calendar template, include fields for video titles, descriptions, and tags. Also, you may add some notes if there are details your team needs to consider when posting a video.
Additionally, you can track watch time and subscriber growth to measure performance in your calendar. It will help you find out what your audience likes and what doesn’t, what YouTube wants from you, and what types of content it doesn’t show to potential viewers.
TikTok
TikTok has a fast-paced and trend-driven nature, which needs to directly impact your posts in order to meet your audience’s intent. Your TikTok section in the social media calendar template should be flexible. Allow for spontaneous content creation to jump on trending hashtags and challenges. Schedule regular posts but leave room for real-time adjustments.
Track performance, engagement rates, and follower growth as key indicators and insights for your future content planning.
Your social media content calendar for Instagram should accommodate different post types – feed posts, Stories, Reels, and IGTV. By using all the post types this social network has, you maximize your chances of being heard.
Plan a mix of visual content to ensure a cohesive look across your profile. Include fields for captions, hashtags, and potential collaborations or influencer partnerships. Track reach, engagement, and story views.
For this platform, your social media content calendar should include different post types – text updates, images, videos, and links. Plan for organic posts and paid ads. Consider audience targeting for each post. Track post reach, engagement, and click-through rates.
X
X is a special platform among all the other ones on this list. With its real-time nature, it allows for planned tweets and spontaneous engagement. Schedule regular posts but leave room for news-jacking and trending topics. Include fields for hashtags and mention relevant accounts. Track retweets, likes, and overall account growth.
You’ll develop a better social media strategy by customizing your social media post calendar template to each platform’s features and audience. This way, your content will resonate with each platform’s audience and generate more engagement. Review and adjust your calendar regularly based on analytics and audience feedback to optimize your social media across all platforms.
Guide to using the Social Media Marketing Calendar Template by xTiles
The xTiles Free Social Media Calendar Template is a flexible tool to help you plan and post relevant content. It is one of our many planning templates to help you with your tasks considering their specifics and aspects, without forcing you to put your plans and posting schedule into something that doesn’t suit them and your team.
Use this template to manage your social media marketing, save time in content creation, and have a consistent presence across all your social media platforms. Whether you’re a solo entrepreneur or part of a bigger marketing team, this will help you improve your social media and workflow.
Here’s how to use it:
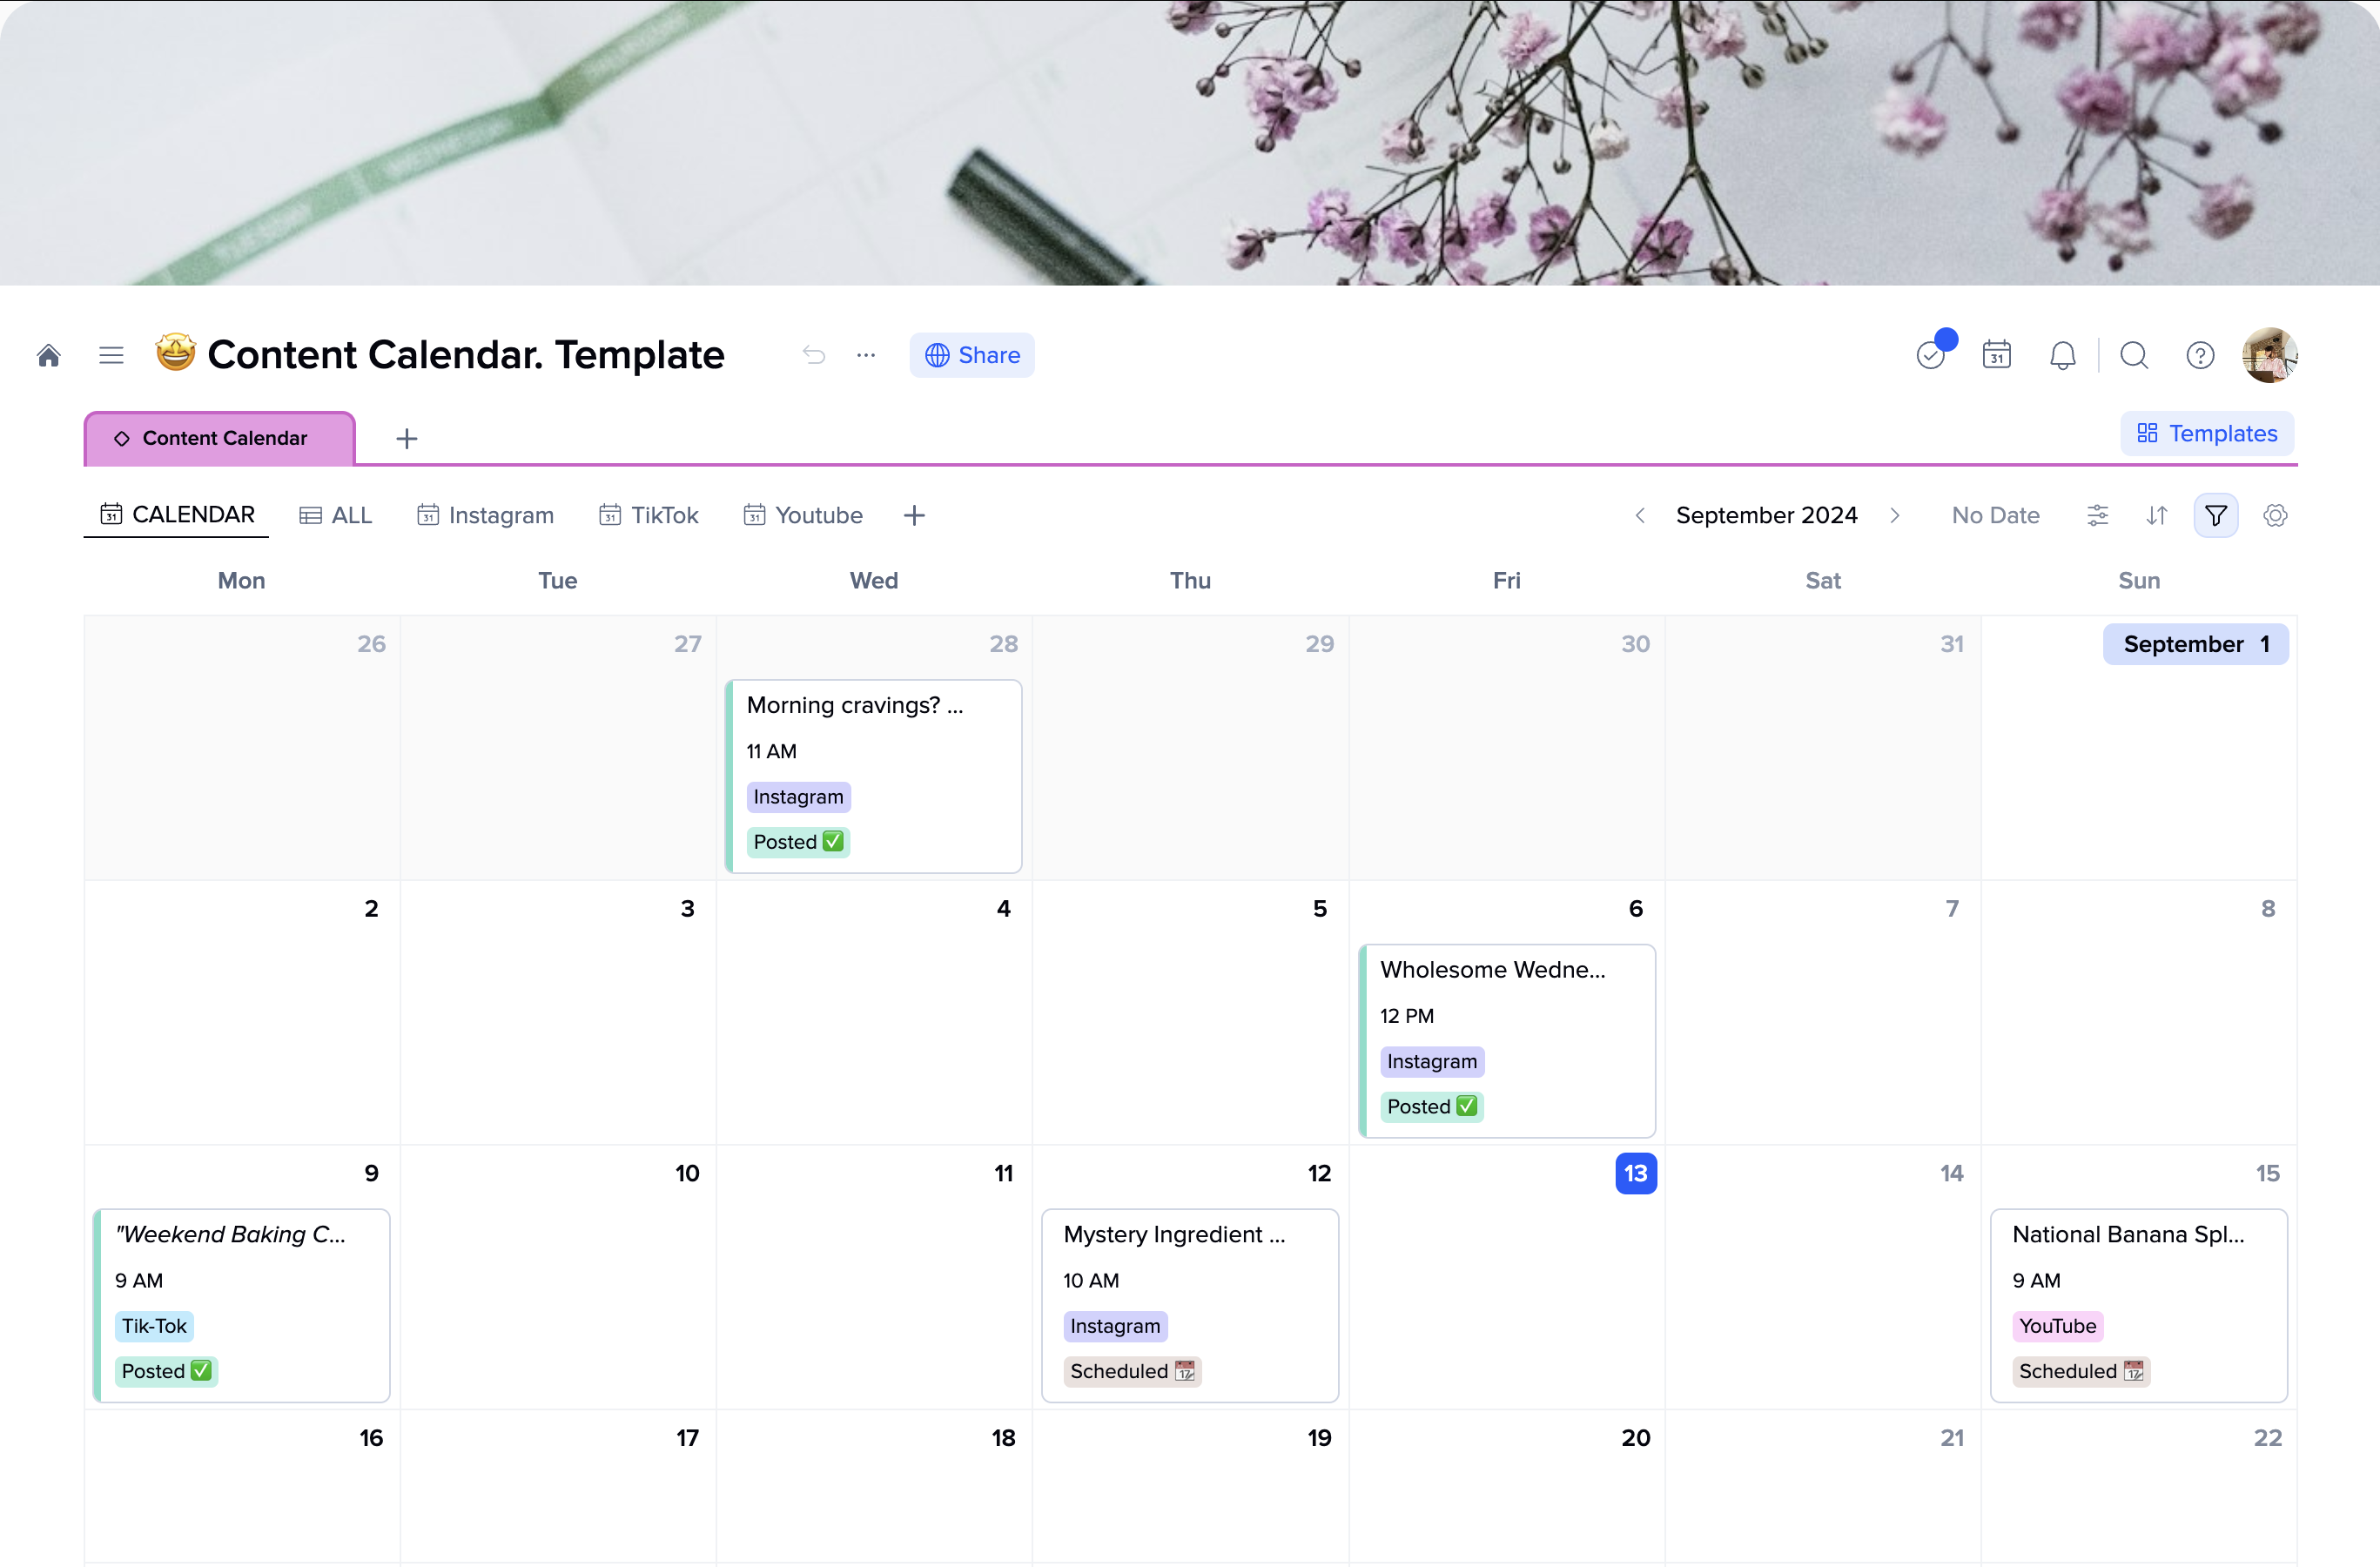
The main part of this template is the calendar where you can create and see your planned social media posts. Each post is a task, so you can assign it to people responsible for content creation, reviewing, posting, etc., and see your content at a glance distributed across days and weeks.
Simply create a task on the date you want. Tasks in xTiles are separate from a common note and can be assigned to other people and have different properties for execution. Additionally, assignees will have all tasks (even from different projects) in one menu accessible from any project or workspace. Tasks in xTiles can be recurring, saving time on task management.
Add properties to make it very detailed to avoid confusion:
-
Due date: When to publish
-
Social media platform: Where to share (e.g., Instagram, Facebook, Twitter)
-
Status: Track each post (e.g., Draft, Ready, Published)
-
Content type: Categorise your posts (e.g., Image, Video, Blog link)
-
Assignee: Who is responsible for the post creation.
Also, you can add your post directly to each task.
One of the social media planning template’s strengths is the ability to switch between views. You can sort and filter your planned posts by any field. For example:
-
View all posts for a platform
-
Filter posts by status
-
Get a table with all the posts you need currently
-
Check which posts need visuals
The other part of the xTiles Social Media Posting Calendar Template is for social media content creation process and your content ideas. It will help you accumulate materials and resources for direct planning. Use this page as a brain dump, mood board, or some sort of a little Second Brain related to your content strategy to streamline your planning.
Use the calendar to plan your content. Ensure you have a balanced mix of post types across platforms and align your content with your broader marketing strategy.
Once posted, you can update each task with performance data. This will help you see what content works best with your audience and refine your marketing strategy. A marketing manager can use this data when creating a content calendar for the next month.
If you’re working on a team, use the template to assign tasks, leave comments, and make sure everyone is on the same page for the content calendar. xTiles is a perfect tool for collaboration due to its flexibility and a wide range of tools that enhance teamwork. Moreover, if your team works across multiple workspaces, you won’t be charged every time. Pay for a user only once and save money for your social media campaigns.
The difference between a free social media calendar template and buying a template: advantages of our service
xTiles free social media calendar template is marketers’ and social media managers’ dream. It has all the features you need to plan your social media campaigns without the cost. This template has customizable views, post task creation, and property fields for due dates and platform specific details.
Unlike paid alternatives, xTiles free template doesn’t compromise on functionality. It can help you with long-term planning, performance tracking, and collaboration – features you only get with premium tools. It’s flexible, so you can use it for any social media strategy or team size.
You can get the same results from expensive social media management tools with this free template. By choosing xTiles you get to keep more of your marketing budget for content creation or advertising and still look professional and organized with your social media management.
FAQ
How do you create a social media calendar template?
Use the xTiles Social Media Calendar Template, a centralized space to plan. Create tasks for each post and add properties like due date, platform, status, etc. Customize the template to fit your needs and use different views to sort and filter posts.
What should I include in my social media calendar template?
Include fields for a due date, social media platform, status (Draft, Ready, Published), content type (Image, Video, Blog link), etc. Consider adding sections for a target audience, performance metrics, captions, hashtags, and associated marketing campaigns.
For which social media platforms is the social media posting calendar template best suited?
The template is flexible and can be used for any platform, including YouTube, TikTok, Instagram, Facebook, and X (formerly Twitter). The xTiles Social Media Calendar Template can be adapted to each platform’s features, audience expectations, and social media team’s workflow.
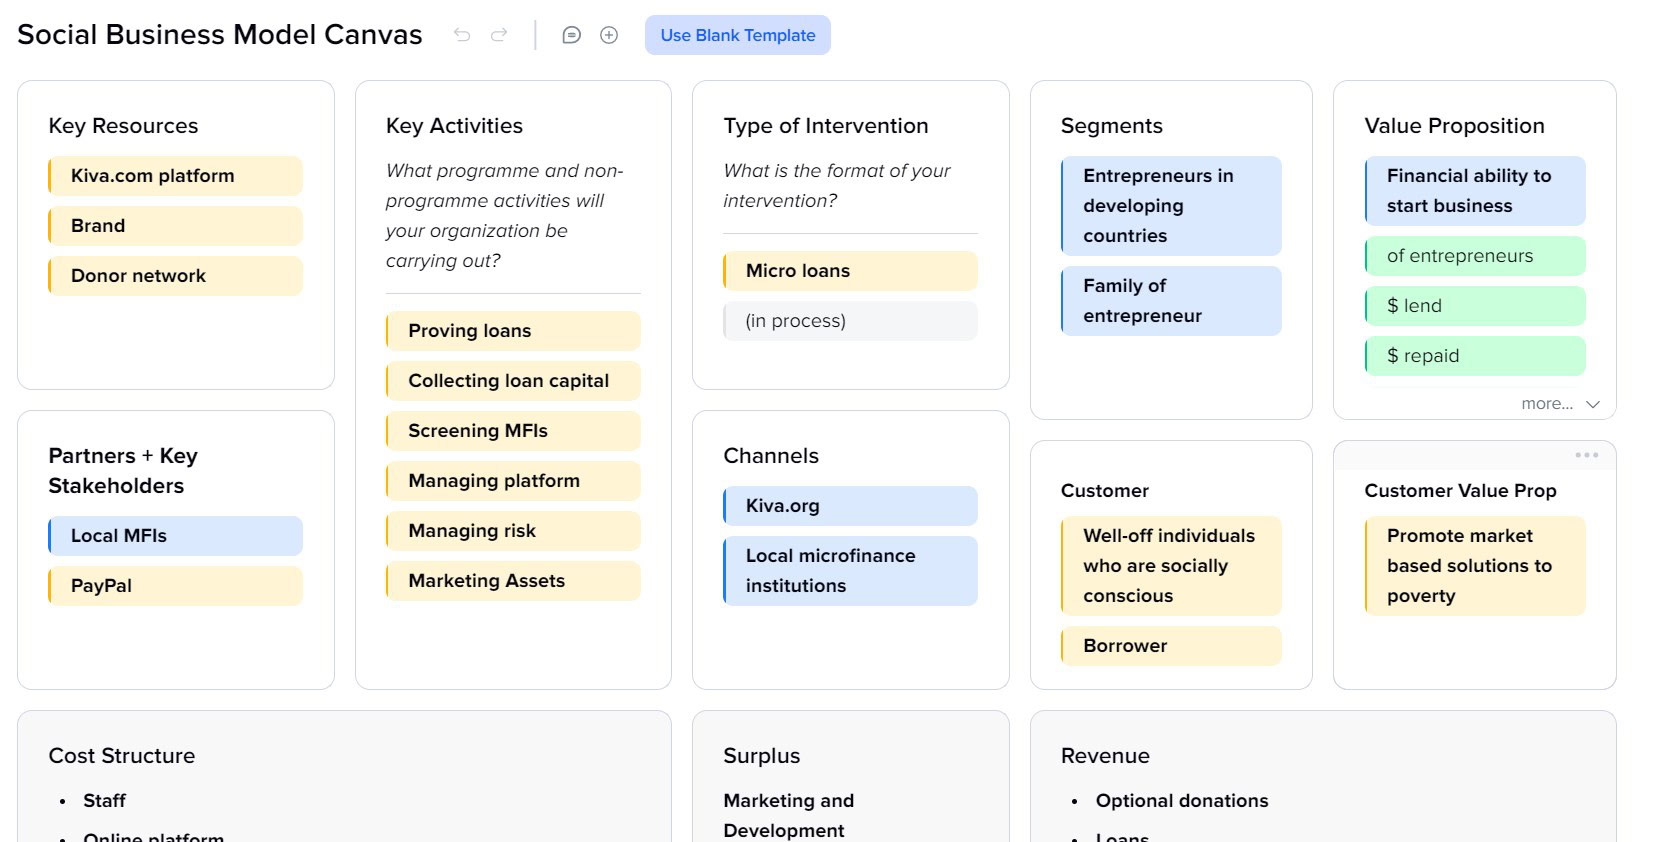
Social Business Model
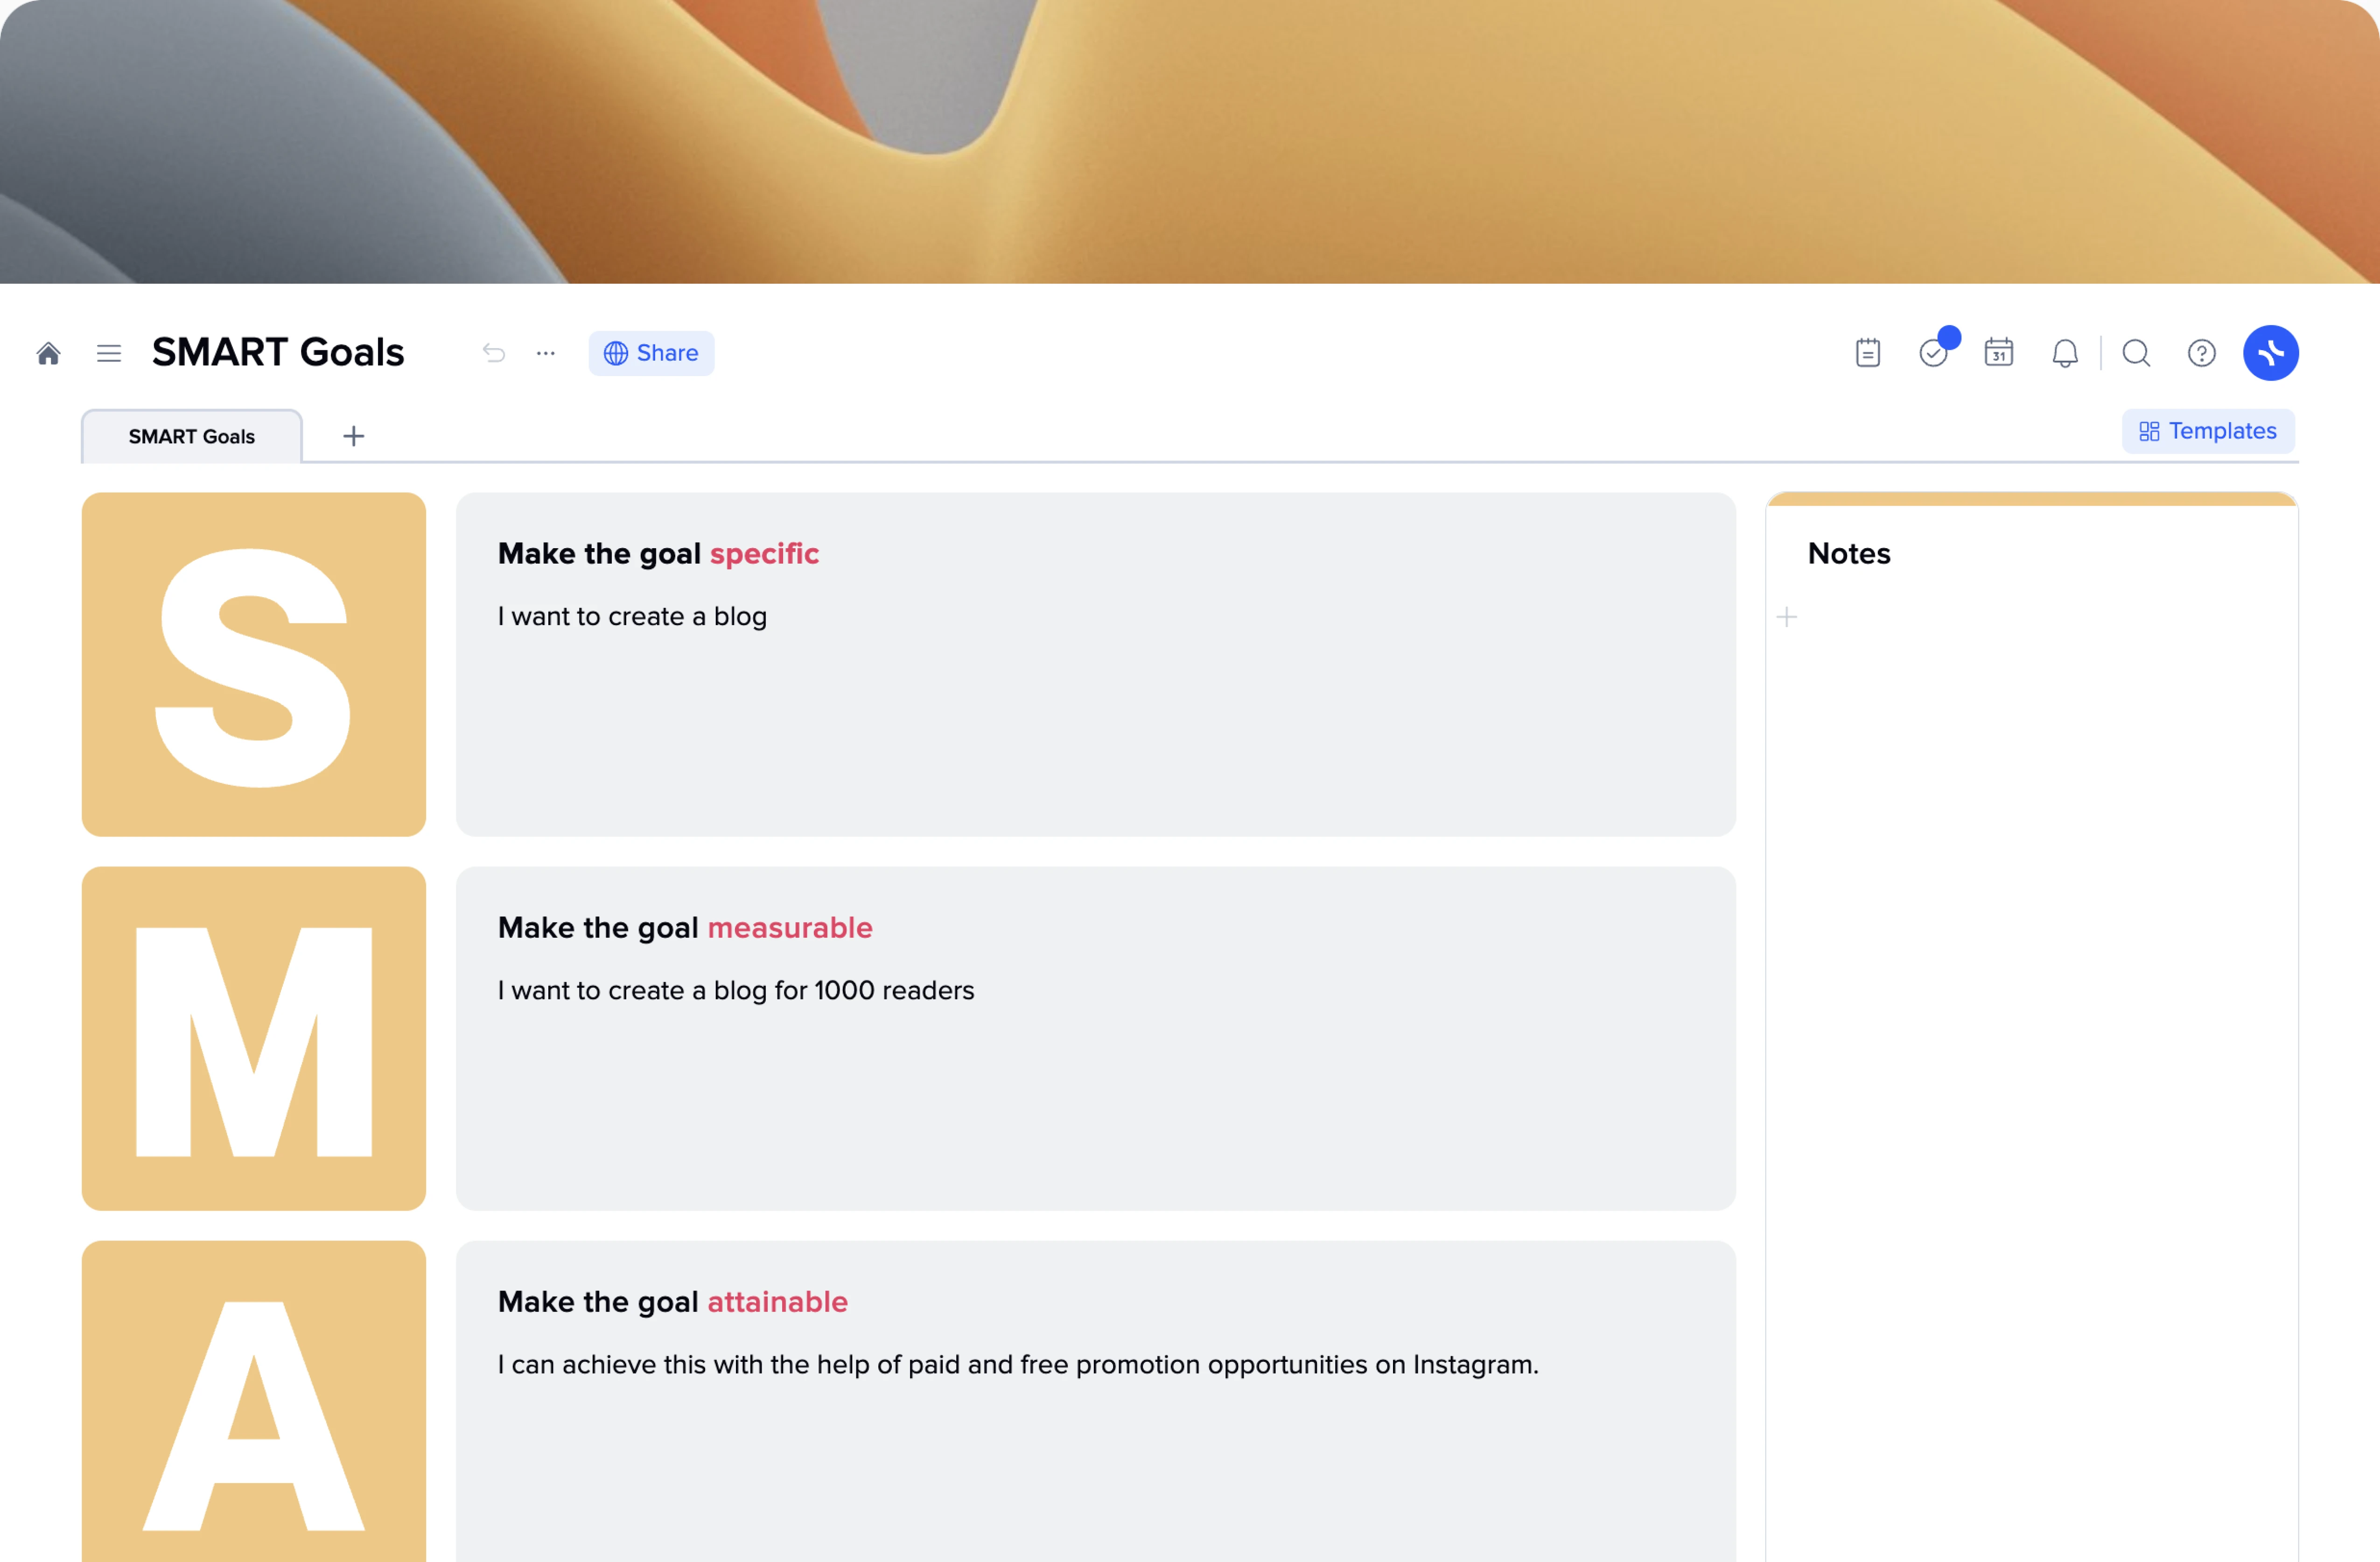
SMART Goals
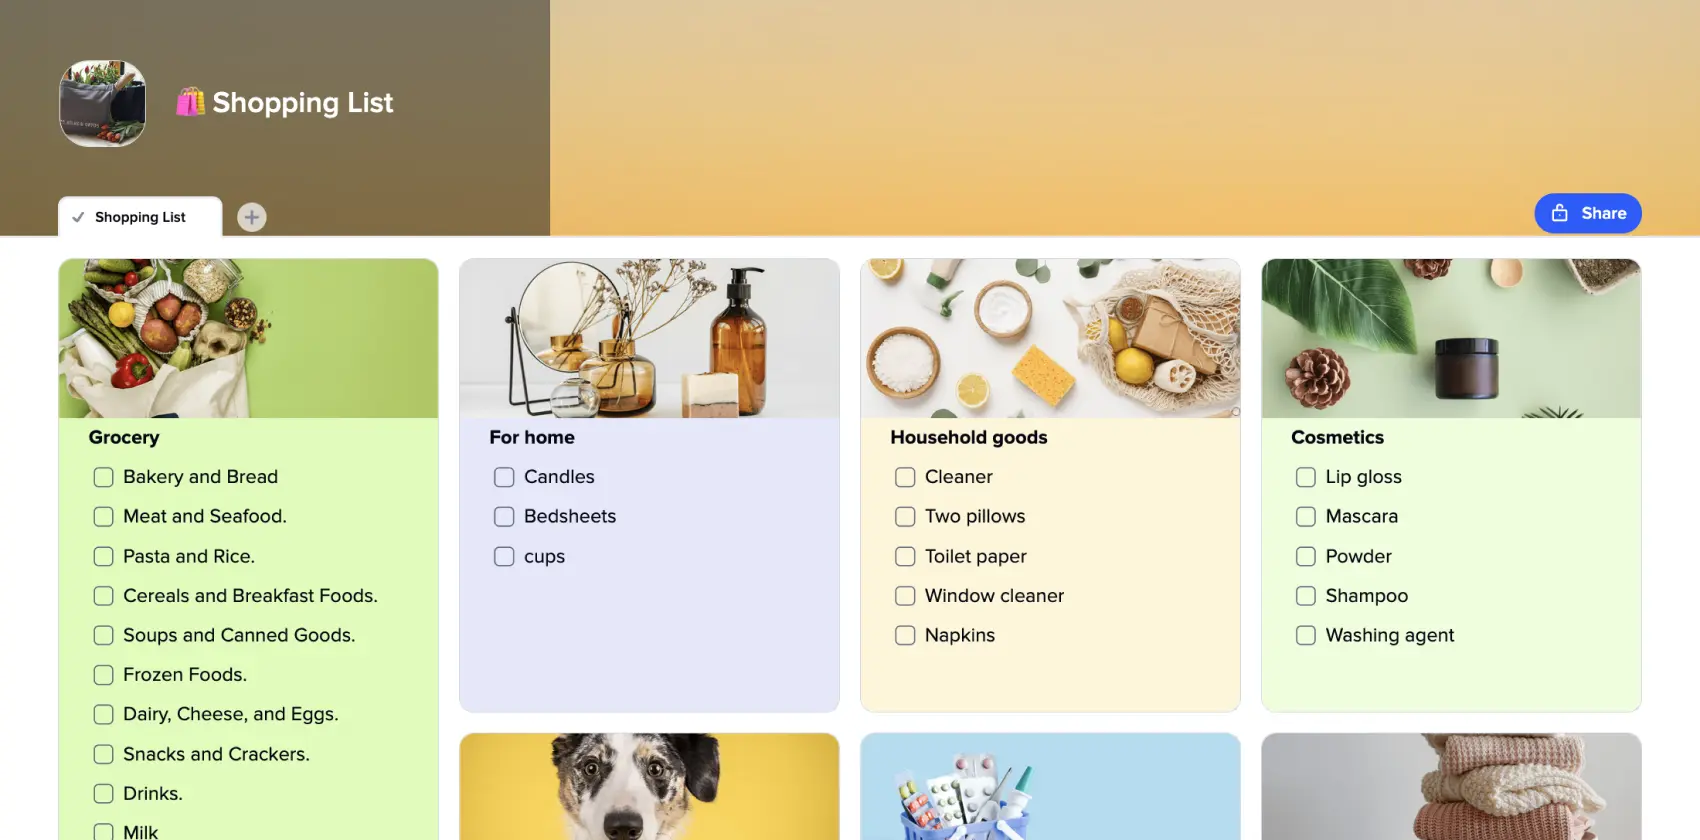
Shopping List
Do you use shopping lists to minimize the time you spend in stores? Or do you prefer to rely on your memory?
The second approach may ruin your budget and habits in the long run, not to mention that you waste much more time strolling between shelves.
If you think that creating a list every time you plan to visit a store is not for you because you don’t normally waste your time creating documents or you will lose that piece of paper anyway, a shopping list template is your solution.
If every visit to any store is a torment for you, and you just grab the first things you see to run away as soon as possible, you may try shopping lists too.
The xTiles shopping list template is a ready-to-use framework where you put names of needed items. Additionally, you get them sorted depending on their kind. No long walks in supermarkets from one shelf to another, only to return to the first one.
Except for the template, we offer you a guide on how to get maximum benefit from your shopping list, turn your shopping into a much nicer and less chaotic process, and save time and money.
What is a shopping list?
A shopping list is a record, either written down or stored electronically, that itemizes the products an individual intends to purchase during their shopping trip. It acts as a prompt and a reference to guarantee the acquisition of all required items.
A shopping list may cover a range of categories, such as groceries, household goods, personal care items, apparel, or any other desired purchases. Also, you may create separate lists for any of these categories.
Creating a shopping list helps people maintain order, save time, and prevent the omission of necessary items. It enables people to pre-plan their shopping and ensures they procure everything necessary while avoiding unnecessary or impulsive buying. Depending on personal preference, shopping lists can be crafted using pen and paper, smartphone applications, or various online platforms.
Shopping lists may be regular or may be created for special occasions. In the first case, a person creates, reviews and updates their shopping list as a week goes.
In the second case, a person normally doesn’t need a list of items to buy because it’s a repetitive action, so they know what has to be in their trolley and what has to stay away. However, starting a new diet, they need a “guide” to help them buy the necessary items. A keto shopping list or a Mediterranean diet shopping list is quite popular.
Celebrating or moving are other special occasions when people may use shopping lists as a supportive tool. For example, they may create a college shopping list or a Thanksgiving shopping list.
Ultimately, even if you don’t use shopping lists on a regular basis, they will come in handy when the habitual tide of life goes awry for different reasons. In this case, a shopping list template is especially useful because it requires zero previous experience and minimum preparation.
What makes a shopping list effective?
An effective shopping list has several characteristics contributing to its usefulness and functionality. Since its main function is to help you do shopping, we can define the next key factors that make it effective:
- Comprehensive
A really good shopping list includes all the necessary items you need to buy. It covers all the standard categories of items people usually purchase, including groceries, household items, personal care products, and any other specific items people require.
- Specific
A good shopping list doesn’t make it harder. All the items are defined and specific so that when you’re in the store, you don’t have to stay there and contemplate, for example, what vegetables you exactly need or do you want dark or milk chocolate.
That is particularly important when you make a shopping list for someone else. While you can understand what you meant, someone else might be overwhelmed by the ambiguity of your list.
- Organized
A good shopping list has a structure. It’s not a stream of consciousness unless you’re a contemporary writer and your lists are part of your texts. The best approach is to categorize the needed items depending on their location in the store or their nature. For example, dairy products are with dairy products; veggies are with veggies, and so on. That will help you navigate through the store more effectively and consequently.
- Prioritized
When a shopping list is long, and you’re pressured by time, you may prioritize the needed items by their importance or urgency. That will help you ensure that essential items are purchased in any case. And if you have enough time or when you have it again, you can buy other items on your list.
- Updated
Unfortunately, you can’t use one shopping list for years. It has to be regularly reviewed and updated. Remove items you have already purchased and add new items as needed. Also, remove items you didn’t like the last time and add new ones to keep your diet balanced.
- Portable
Make sure your shopping list is on you or it is easily accessible. A digital solution such as a smartphone app or a note-taking tool that you can access on the go offers more convenience and easy editing options.
- Personalized
A good shopping list is really yours. It reflects your lifestyle, not someone else’s. Tailor it to your dietary requirements, household size, and any specific items you need. That will help you ensure that your shopping list covers all of your needs.
These elements may enhance your shopping list effectiveness and make your shopping experience more efficient and organized.
Paper-based shopping lists VS smartphone apps VS online platforms with list-making features
When it comes to crafting a shopping list, people have a variety of options, including applications, online platforms with list-making features, traditional paper-based lists, Google shopping list, etc. Let’s compare all of them.
- Paper Shopping Lists:
This category offers a traditional and tangible approach to list-making. Lists created on paper are easy to write and customize, yet they also easily become messy due to too much customization.
With a paper list, you can physically carry it to the store, making it accessible even without a digital device. However, paper lists require manual updating and rewriting for each shopping trip, which is time-consuming.
Additionally, they are susceptible to being lost or damaged if not properly kept or misplaced.
- Smartphone apps:
Smartphone apps offer a convenient and portable solution for creating lists.
These apps have various helpful features, including the ability to categorize items, set reminders, and synchronize your lists across multiple devices, ensuring that your list is always at hand. You can’t lose or forget such a list since it’s always on you.
Usually, these apps allow attaching pictures, including notes, and specifying quantities, to make your list more detailed and comprehensive.
- Online Platforms with List-Making Features:
This option offers the convenience of accessing your shopping list from various devices. The only requirement is to have an internet connection.
These platforms often provide a user-friendly interface where you can easily create and organize your list.
They may offer additional features such as sharing lists with family members or friends, creating multiple lists for different purposes, and even syncing with online grocery delivery services. Online platforms ensure your list is readily available whenever and wherever you need it.
- Google Shopping List:
Google Shopping List is a specific list-making feature offered by Google. It allows adding items using voice commands or manual input. It also allows for collaboration, enabling multiple users to contribute to the list simultaneously. Integration with Google Assistant further enhances convenience, as you can manage your list hands-free using voice commands.
- xTiles
xTiles combines all of these options. The templates you receive are easy to customize, yet they are thoughtfully designed, with a well-structured layout that can be used without any modifications. The synergy between the desktop and mobile versions enables quick and easy access to your lists, allowing you to jot down your thoughts on future shopping while on the go
While paper shopping lists offer a traditional and tangible approach, smartphone apps and online platforms with list-making features provide the advantages of digital convenience, easy updates, and accessibility across devices. Ultimately, the choice depends on personal preference and the features that best meet your needs and shopping habits.
Why creating shopping lists is advantageous?
After years of the shopping experience, many of us have developed our own routines and rituals. Some of us prefer to buy everything needed for a week and forget about stores till next time. Some of us go there every time after work. Some of us make a quick ride, and some prefer to check everything slowly, etc.
The ever-expanding range of brands and choices can easily overwhelm us.
The abundance of choices can be daunting and leave us feeling scattered while offering improvements over our everyday purchases at the same time. That often results in returning home with the wrong items or even empty-handed. The surplus of options might lead to overthinking, causing decision paralysis. Conversely, it might also be distracting, leading to overspending and exceeding our budget.
This is where a grocery list comes to the rescue, ensuring efficient shopping without the need to make U-turns for forgotten milk or other essentials. Create a grocery list every time you need to visit the store or keep a standard list for a week, regularly updating it when you require specific items.
There’s nothing worse than returning home just to realize that you bought soy milk instead of almond milk, forgot the eggs, or purchased more bananas when you already have a ripe bunch in the back of your fridge.
An organized shopping list ensures you’ll never find yourself halfway through a recipe, only to discover that you’re missing essential ingredients.
How to create an effective shopping list using the xTiles Shopping List Template?
Creating a shopping list is harder than just putting all the items on paper or into an app. If you want it to be helpful, you need to consider a few aspects which will turn a regular list into a powerful tool for maintaining your household.
Let’s create a workable shopping list on the example of a grocery shopping list.
- Assess your current stocks:
While it may seem like common sense, it is crucial to be aware of what you already have on hand. This knowledge allows you to accurately identify what you require so that you won’t end up with, let’s say, too much meat and no vegetables or vice versa.
Begin by opening your pantry, refrigerator, and freezer, and taking inventory of their contents. This compilation serves as your comprehensive list. If you possess multiple storage areas in your home, such as a mini-fridge in the basement, be sure to assess those as well.
Additionally, take note of the expiration dates for each item. For instance, even if you have a full jug of milk, it becomes necessary to restock if it expires tomorrow.
- Organize your priorities through categorized lists:
Begin by examining available items or the previous list, even if it was on a scrap of paper or in saved messages on your favorite messenger. Identify items that are running low and those that you have in abundance. Then, create a separate list of items you currently do not possess.
To effectively prioritize these items for replenishment, you may establish three distinct running lists. You may label them depending on your preferences. Just choose labels you like or ones that are easy to identify at first glance. When one item starts running low, put it into the category “need to restock.” These priority lists will help you keep your stocks always full.
Creating separate lists will provide you with the utmost organization. However, if you prefer maintaining only a single list for immediate purchases, that approach works as well. Nevertheless, having a couple of lists – rather than just one list – accessible during your store visit can prove advantageous, especially if you come across a great deal on items you have enough at home.
- Opt for a categorization approach:
To enhance your system, consider implementing a categorization system that goes beyond the basic lists and covers your dietary needs, food preferences, household needs, loved ones’ needs, etc.
For example, when the grocery part of your list organization is based on food groups, it provides the benefits of tracking nutrition, increasing awareness of food group consumption, and potentially encouraging a more balanced diet. It is particularly helpful for individuals with allergies or dietary restrictions.
If your primary focus is efficient shopping and saving time in the store, categorizing your list according to the store layout is recommended. However, keep in mind that this approach works best if you primarily shop at a single store. Keep your go-to store in mind when organizing your list based on the store’s layout.
Adopting a shopping categorization system may add an extra level of organization and efficiency to your shopping routine, aligning it with your specific needs and priorities.
- Make additional lists based on specific needs:
In addition to the priority lists, you may create further lists to address specific requirements. For instance, items for special occasions are worth being included in an independent list.
Suppose you are planning for this week’s meal preparation. In that case, creating a dedicated list is beneficial, considering the need for careful planning. Furthermore, when you intend to follow a new recipe, check if there are any additional or rare ingredients you rarely have at home required and incorporate them into your list.
Suppose you have plans for a romantic and luxurious date night with your significant other. In that case, crafting another list specifically for gourmet shopping or when you go all out to create special meals from scratch is advisable.
These lists will naturally differ significantly from the everyday essentials you purchase weekly.
By creating these additional lists, you can cater to unique occasions, specialized cooking preferences, and specific recipes, ensuring you have a comprehensive and well-organized approach to your shopping endeavors.
- Allow flexibility and space for unplanned changes in your planning:
Once you have your lists in order, leaving some room for flexibility, especially regarding sales, is essential. If you have items on your list that will be on sale soon, consider whether it’s possible to postpone their purchase till later.
However, it’s crucial not to let these discounts and deals dictate your entire shopping trip, particularly when it comes to the red-labeled items on your priority list. Stick to your list and try to avoid getting too easily distracted, as it can undermine the purpose and effectiveness of your carefully curated lists.
- Track your progress while shopping:
Crossing items off your list as you go provides a sense of accomplishment and helps you stay organized and focused. Remember to mark items off your list as you place them in your shopping cart to avoid unintentional duplicates. You can use check marks or a color coding system to indicate completed items.
When navigating the store, prioritize nonperishable items such as canned foods and chips. For example, buying ice cream when you enter the store may feel rewarding, but it might not make it until you come to the checkout counter.
By following this sequence, you can maintain the quality and condition of your items throughout your shopping trip.
- Regularly review and update your lists:
After creating your lists and completing your weekly shopping, it’s important to check in weekly. Evaluate your inventory and adjust items depending on their priority.
Ultimately, it is advisable to make weekly grocery trips. However, if your diet heavily relies on fresh produce, you may need to replenish more frequently.
Additionally, special occasions and holidays may call for specific items, so preparation’s essential. Keeping your list up-to-date ensures you are well-prepared and equipped for any situation.
How to create a grocery shopping list?
Crafting a grocery shopping list is a straightforward procedure that fosters organization and guarantees the acquisition of all necessary items. Below we described a detailed approach to creating general shopping lists. Now, let’s look at how to create more specific shopping lists that may become elements of your grand shopping list.
Here are some guidelines for fashioning efficient grocery shopping list:
- Check your fridge:
Before composing the list, survey your pantry, refrigerator, and freezer to identify the available items. That helps to prevent purchasing duplicates or unnecessary products.
- Plan meals:
Contemplate the meals you intend to prepare during the upcoming week, including breakfast, lunch, dinner, and snacks. Jot down the required ingredients for each meal. That will help you buy only those items you really need and avoid trying to cook meals out of what you got.
Also, if you have new recipes or special dishes in mind, review the necessary ingredients and add them to the list accordingly.
- Account for personal requirements:
Consider dietary restrictions, allergies, or specific preferences for yourself and your family members or your guests.
- Categorize the list:
Arrange your list into categories such as fruits and vegetables, dairy, meat and seafood, pantry staples, snacks, beverages, etc. That facilitates navigation and efficiency while shopping.
- Establish priorities and quantities:
Identify high-priority items that require immediate purchase. Consider the quantities needed for each item to ensure you won’t run out before your next shopping trip.
- Review and refine:
Prior to heading to the store, review your list to ensure nothing has been overlooked. Make any necessary adjustments or additions as required.
- Adhere to the list:
During your shopping trip, adhere to the items on your list to avoid impulsive purchases and stay within your budget.
By following these steps, you may fashion a comprehensive and well-structured grocery shopping list that meets your requirements, enhances organization, and streamlines your shopping experience.
What to consider when creating shopping lists for specific diets, like a military diet shopping list or a paleo diet shopping list?
Creating shopping lists for specific diets, such as military or paleo, involves several crucial aspects one should follow to reach desired results. Before starting any diet, remember that only a doctor or certified nutritionist can recommend some diets.
Once you have permission or recommendation from your doctor, you can start creating your shopping list.
First of all, you need to understand the diet principles. That’s why it’s crucial to talk to professionals. They will also help you to consider macronutrient ratios. You need to familiarize yourself with the guidelines and limitations of the particular diet you’re about to follow.
Then you need to identify approved food items and compile a list of foods allowed in your diet.
For keto, this might include foods rich in healthy fats like avocados, nuts, and fatty meats. For paleo, it could involve lean meats, seafood, vegetables, fruits, and so on.
Planning meals is half of the success of sticking to your new diet. Devise a meal plan for the week based on the diet guidelines. This will enable you to identify the necessary items for your shopping list. Also, you will test yourself to see whether the diet suits your food preferences.
No matter your diet, prioritizing fresh and unprocessed foods is always key to a healthy lifestyle.
When in a store, remember to read labels carefully. Many items on your list may be unfamiliar to you, so you need to check them before putting them into your basket. Also, that will help you better understand your diet.
If you have specific dietary needs or allergies, consider them when creating your shopping list. However, it’s better to discuss them with your doctor to find suitable alternatives or substitutes that comply with your diet and fulfill your nutritional needs.
Finally, always embrace flexibility and creativity. Don’t be afraid to experiment with new ingredients and recipes that fit within your dietary framework. Explore different options for flavorings, spices, and cooking methods to keep your meals interesting and enjoyable. Let your diet be an intriguing journey.
How to create a college shopping list?
Crafting a college shopping list is vital to ensure you have all the necessary items for your new living arrangements. Starting a new chapter in life is an exciting moment for parents and children. That’s why every way to ease the process is helpful.
When making a shopping list for college, start with assessing your requirements. Consider the specific items essential to your college lifestyle, taking into account whether you’ll be residing in a dormitory or renting an apartment.
Depending on the previous point, compile a list of essentials. Begin by jotting down the everyday items you’ll rely on, including bedding (sheets, blankets, pillows), towels, toiletries (toothbrush, toothpaste, shampoo, soap), laundry supplies, and cleaning supplies.
Then consider academic needs. Ponder the supplies necessary for your studies, such as notebooks, pens, highlighters, folders, a backpack or tote bag, and a desk lamp. If you anticipate using a computer, decide if you’ll require a laptop or desktop, along with any associated accessories like a printer.
Don’t forget about attire and personal belongings. Construct a list encompassing clothing items suitable for various occasions, shoes, hangers, a laundry hamper, and personal hygiene products.
You may also account for shared items. If you will be sharing the living space with roommates, you may communicate with them to avoid duplicating certain items, such as cleaning supplies, kitchen utensils, and appliances.
Review and refine your list and ensure the items you bring with you don’t violate college guidelines.
Lists for moving are usually long. That’s why keeping an eye out for deals, discounts, and student offers to make the most of your purchases may be a wise idea. Consider exploring online retailers or stores that specialize in college essentials, providing a wide range of options.