Digital planners have changed the way we live our lives, offering a flexible and portable digital version of traditional paper planners. These handy tools allow you to manage your schedule, track your goals, and boost productivity – all from your favorite device. Among the many platforms for creating digital planners, xTiles stands out as a powerful and user-friendly option.
xTiles has these advantages for digital planning:
- Intuitive interface: easy to use even if you’re new to digital planning
- Customization options: personalized layouts and designs
- Cross-platform compatibility: access your planner on multiple devices
- Collaboration: share and work on planners with others
- Integration: connect with other productivity apps
Follow along, and we’ll take you through the process of creating your own digital planner with xTiles. We’ll cover from initial design concepts to advanced customization. By the end of this tutorial, you’ll have the know-how and skills to create a digital planner that works. Whether you want to use it for personal use or potentially sell it online, we’ve got you covered.
Step 1: Sketch Out Your Main Whiteboard
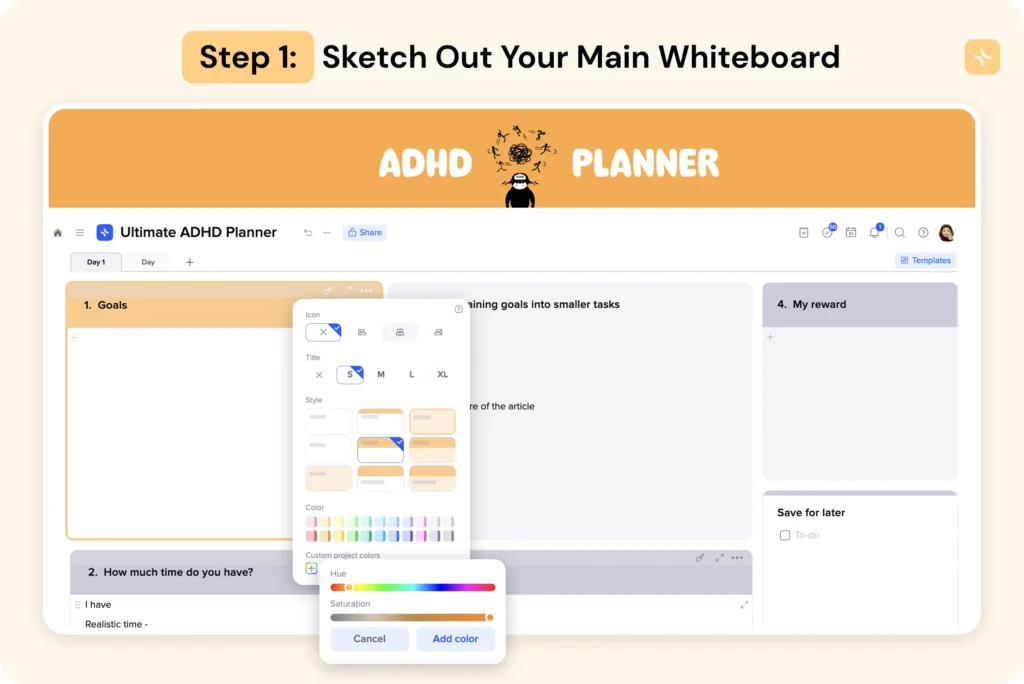
Creating a digital planner in xTiles starts with designing your main whiteboard, which is the central hub of your planner. This step is key to moving from a traditional paper planner to a digital one.
Here’s how to get started:
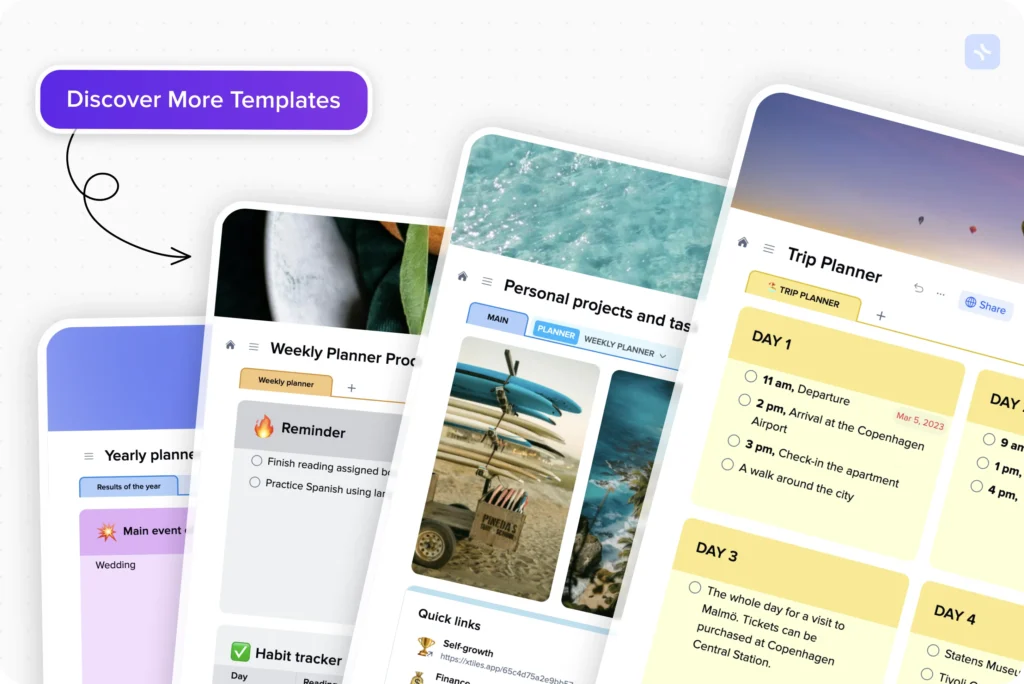
Look at templates for inspiration
Before you start designing your own digital planner, take some time to look at xTiles Template Gallery and. These template selections can give you ideas for your digital planner business.
Additionally, you won’t need a digital sketch program, Google Slides, Microsoft PowerPoint, or design program to make a layout. The whole process can be easily conducted in xTiles is a free alternative for beginners who want to create digital planners.
You can also create an interactive PDF template in xTiles, incorporating features that allow users to download and interact with the digital version just like a physical planner. This includes hyperlinks for easy navigation, providing a seamless experience on various apps. Just press the three-dot menu right to your Template (Project) name and choose converting to PDF once it’s ready.
Choose your style
Choose a colour scheme and theme that you like. After reviewing at least a few digital planner templates, you probably know what you want to do. However, here are a few general tips to consider when designing your planner:
- Choose colors that are readable and visually pleasing. Surely, some people would prefer flamboyant designs, but if you want to sell digital planners, a “calm” and universal color scheme can help you appeal to a wider audience.
- Themes that reflect you or your brand. Your planner pages have to be unique, and your style has to be visible in every element of them. That is another important aspect of creating a digital planner if you want to sell your templates.
- Design elements that make your planner different from traditional planners. If you create a digital planner for yourself only, you can make it as specific as you want. The main point here is to make it useful for you. However, if you want to sell your digital planner work, try to find a balance between wide functionality and neat and clean design.
- Remember the beauty of a digital planner is its flexibility – you’re not limited by paper planners.
Create your main layout.
Decide what you want to have on your main page. This could be:
- A monthly calendar spread for quick reference
- Space for daily or weekly schedules
- Sections for goals, tasks, or habit trackers
- Nested notes or pages as a quick access to other pages or sections
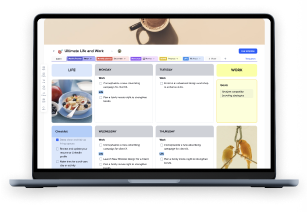
Creating digital planners in xTiles
Now it’s time to do the job. You already know and have everything you need to start your digital planner design.
- Create a workspace for your project. On the home page, click on the “+” button near the Personal Spaces chapter. Choose a name for your workspace.
- Press the “Create a project” button. You can start from scratch or use one of our templates to make the process easier and faster. Google Slides is also a user-friendly, free alternative for beginners who want to create digital planners.
- When designing your layout, think about how you can use xTiles features to make something more than a printable or PDF planner. For example, you might include interactive elements that wouldn’t be possible in a paper planner.
- Think Ahead. As you design your main whiteboard, remember you may want to add more pages or sections later. Leave some extra space or plan for easy expansion for future additions to your digital planner.
By designing your main whiteboard, you’re setting up your digital planner to be a useful tool for staying organized or even a product to sell online.
In the next steps, we’ll customize your planner pages and add advanced features to make your digital planner truly unique and functional.
Step 2: List Out the Pages You Want to Include
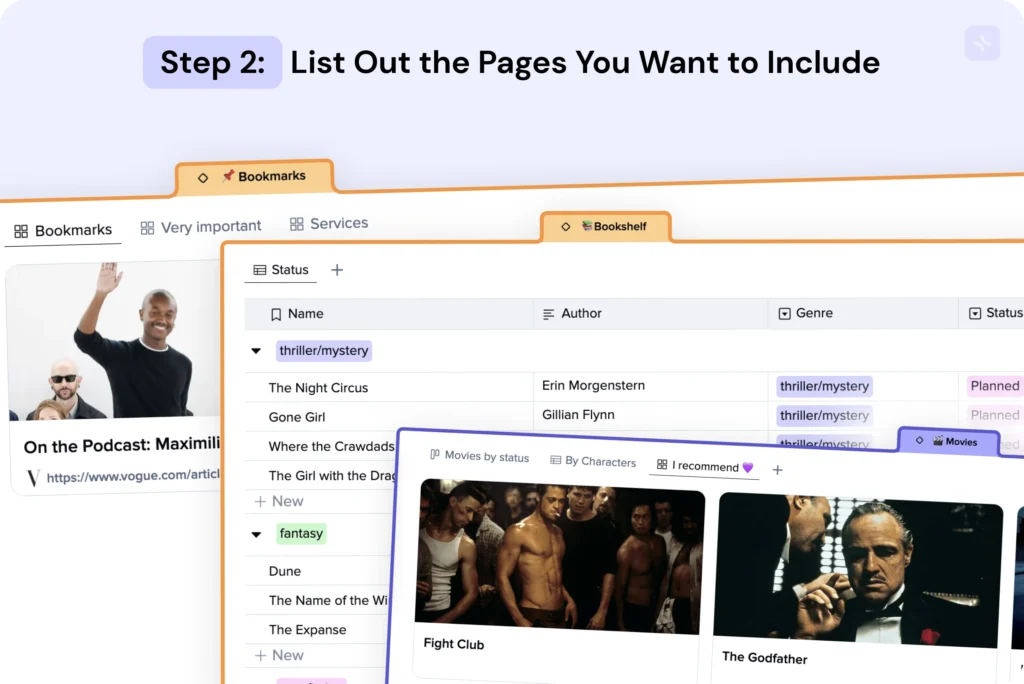
After you’ve sketched out your main whiteboard, the next step in creating your digital planner is to decide on the individual pages you want to include. This is where your digital planner really comes into its own compared to a paper planner, with more flexibility and customization.
Here are the pages to consider:
- Monthly calendar spreads:
- A bird’s eye view of each month to help people quickly evaluate their time and resources whenever they need to plan/add something more.
- Space for important events and deadlines that stand out among all the other elements and data in the planner for easier navigation. That will be especially important if you want your template to be used collaboratively. It will ease communication between all the users.
- A yearly calendar for quick reference to help people plan broader while still having their smaller goals in front of them.
- Weekly and daily planners:
- Weekly layouts for detailed planning
- Daily pages with hourly schedules
- Tasks, priorities, and notes sections
- Habit, meal, water, exercise, etc. trackers:
- Visually appealing habit trackers to help people stay on track with a healthy routine, not only their daily tasks
- Meal planners with grocery lists to help maintain a healthy, nutritious diet and have the energy to complete all the tasks on their to-dos
- Water intake logs to help people stay hydrated
- Exercise tracking pages to help people have their daily amount of activity based on their schedule and load
- Yearly goals and reflections:
- Pages for setting and reviewing annual goals
- Monthly or quarterly reflection prompts
- Vision board or mind map section
- Extra pages to consider:
- Budget planner and expense tracker
- Project management pages
- Reading lists and book logs
- Travel planner and packing lists
- Gratitude journal
- Brain dump or idea capture pages
Delete something is always easier than adding something. That’s why it’s best to add all the elements a user might need, providing them the opportunity to delete what they think is unnecessary.
Remember, one of the benefits of a digital planner is you can add or modify pages as you need to. This flexibility means your planner can evolve with you, making it a more useful tool than static printable planners or PDFs.
By choosing and designing these pages, you’re creating a full digital planner that will help users stay organised, track habits, and achieve their goals. Whether you’re using this for personal use or as part of a digital planner business, these pages will make your planner stand out from the crowd.
Next, we’ll get into the nitty-gritty of designing these pages and adding interactivity to make your digital planner functional and user-friendly.
Step 3: Order Your Pages
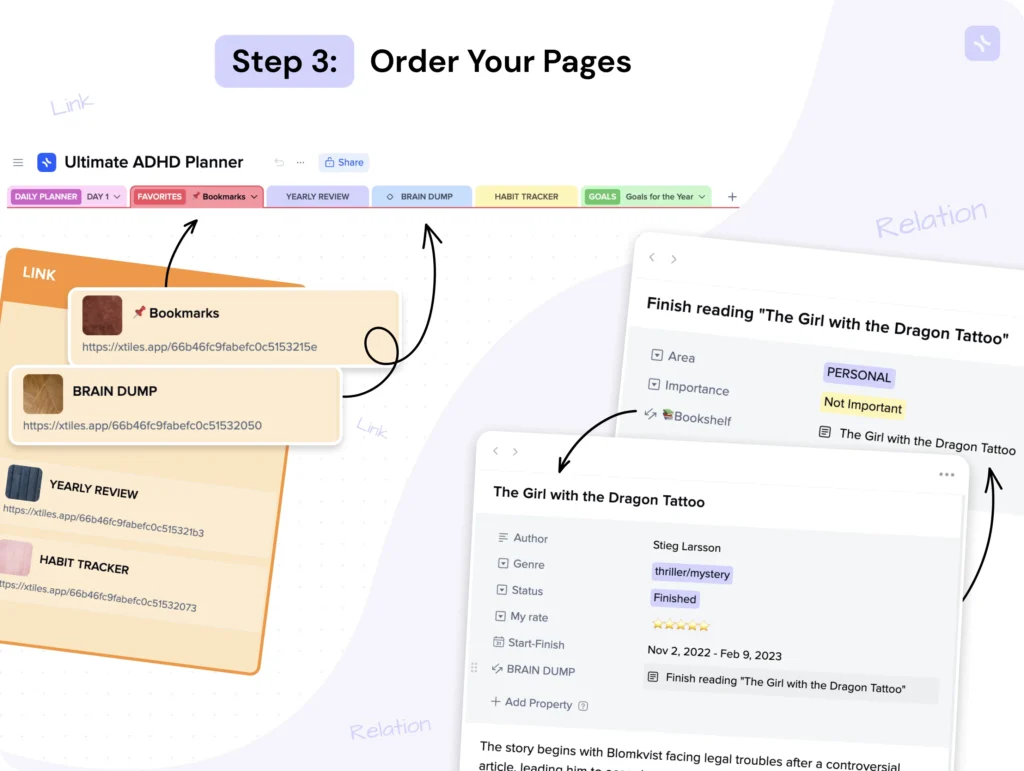
Now that you have listed out the pages you want in your digital planner, the next step is to organize them in a logical and user-friendly way. This step is key to creating a digital planner that’s easy to navigate and helps you stay organized. Here’s how to do this:
For advanced layout design and customization, consider using Adobe InDesign. It offers features like hyperlinking and integration with other Adobe products, making it an ideal choice for creating high-quality PDFs and customizable templates.
Think about how you’ll use your planner:
- Yearly overview and goals
- Monthly spreads
- Weekly and daily layouts
- Habit trackers and special pages throughout.
Organize your planner pages logically
It’s all about the flow. A well-organized digital planner can be a superpower for productivity and personal management over a physical one. It will naturally lead a person from section to section and from page to page naturally.
The logical structure will ensure your planner isn’t a riddle but a useful tool for everyone.
- Group similar pages together. In xTiles you can create a separate group of pages for different layouts. For example, your monthly planner pages can be organized within one group to enhance usability and preserve the neat look of your planner. This way, a user gets everything they need, but they are protected from an overload, which is especially important when choosing a planner.
- Chronological order is important, too. Ensure everything is structured organically:
- Months from January to December
- Weeks within each month
- Daily pages after each week or in a separate section
- Ensure ease of use by grouping pages and sections depending on how frequently they will be used:
- Frequently used pages (daily schedules) in easy-to-reach spots. A user doesn’t have to scroll or use Command+F (Ctrl+F) to find something they need
- Less frequently used pages (yearly reflections) on a separate page, closer to the end of the tabs
- An Index page for quick access to the most important pages
- Use Collections to enhance usability and features people get with your planner.
Collections in xTiles are databases designed for complex projects that need multi-level organization. They can be of 4 kinds: tables for managing large datasets efficiently, galleries for visual resources and elements, boards for task tracking and project management, and calendars for scheduling and planning
- Place trackers strategically:
- Habit trackers at the beginning of each month or week
- Meal planners closer to weekly spreads for meal prep
Use xTiles features for navigation
The more complex planner you want to create, the more time you need to devote to creating a navigation process that is seamless and natural. xTiles features will help you with this part.
- Add hyperlinks between related pages (e.g., link monthly overview to weekly spreads). Copy a link of a tile you want to insert using the three-dot menu in the tile header, and then paste it where it is supposed to be. When a user click on such a link, they get the tile opened without leaving the page.
- Nested tiles and expanded blocks to insert a large amount of information without overcluttering the planner.
Leave room for customization
Customization will become a final accent, allowing users to turn a template into a workable planner. Even if your intent is to provide users with a planner they can use the moment they add it to their Workspace, a bit of space for their own solutions will enhance their experience.
Think digital
Unlike physical planners, digital ones can be reorganized easily. Take advantage of this in your design. By organizing your pages well, you’re creating a digital planner that looks good and works well.
Next, we’ll look at adding interactive elements and making your planner device and platform-friendly.
Step 4: Design and Organize Your Planner’s Pages
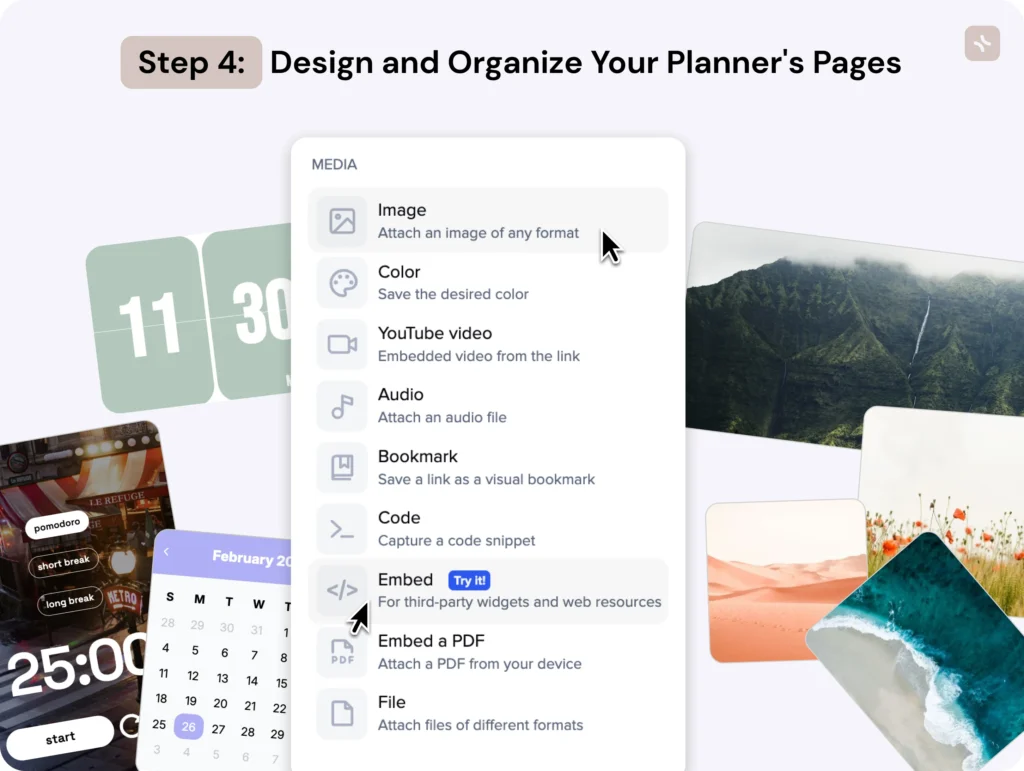
Now that you have outlined your digital planner structure, it’s time to make it happen using xTiles features. This is where the magic happens, and your planner will start to look and function like a pro in the digital world.
Here’s a step-by-step guide to creating your own digital planner template:
- Create a new project in xTiles. Give it a name, this will be important when you submit your template. Go to your Home page and click the “new project” button. It is located right, just below the template suggestions. You can choose one of them to make it quicker.
- Now, add the needed tiles for each page. Keep the style and color palette consistent. Apply rational design principles. Make sure there’s a good contrast between text and background for readability.
- Use xTiles features like collections and views to organize the information. Choose the needed option from the dropdown menu you see when you press the “+” button to add a new page.
- Use xTiles interactive features. Add widgets, links, tables and checkboxes to make it functional. Consider adding the Spotify widget for a better user experience. If you want to add a widget, click on the “+” button on the left side of a title or press “/” and choose the needed element from the dropdown menu.
- Put clear instructions inside the template. Use placeholder text to show how the planner should be used.
Remember, it’s all about balance. A good digital planner should be beautiful and easy to use, utilizing xTiles to offer features that go beyond traditional paper planners and other digital planning tools.
Step 5: Make Your xTiles Planner Ready to Use with Template Settings

We’re almost there! Now, we have to finish your template’s design.
Design your planner pages according to the detailed plan we made previously. Create a page for every important section of your planner. Just press the “+” button right to the existing one. If you want to create a group of pages, press the three-dot menu button on a tab you want to add to.
Also, don’t forget to choose a nice cover image representing your template.
By focusing on UX and using xTiles features, you can create a digital planner that has more functionality than a paper planner.
Finally, review and test your template thoroughly. Make sure all interactive elements work as expected.
You can now enjoy your template or sell it on digital platforms. To prepare for future sales, save your project as a template by selecting the three-dot menu next to your project’s name.
Summing up
Now you have a digital planner with xTiles, and the world is your oyster for organisation and business opportunities. You’ve followed this step-by-step guide, and now you have a functional, beautiful, and customizable digital planner that goes beyond the limits of paper planners.
xTiles powerful features – from intuitive design tools to interactive elements and Collections – let you create a planner that meets your needs or stands out in the digital market. The platform lets you create everything from simple daily organizers to complex project management tools, all with a user-friendly interface.
Remember, the secret to a great digital planner is thoughtful design, logical organization, and the ability to utilize the unique features of digital tools. Whether you’re using it for personal use or selling your creations, xTiles is the platform that brings your vision to life.
Ready to change your planning game? Start with xTiles today. Go to xtiles.app and get creative with our powerful and user-friendly tools. Whether you want to boost your productivity or start a digital planner business xTiles is your partner in organisation and success. Don’t just plan – innovate, organize, and thrive with xTiles!
FAQ
How do you create a digital planner in xTiles?
To make a digital planner in xTiles, you need to design a main whiteboard, list and organize pages, and use xTiles features like Collections and interactive elements. xTiles has an intuitive interface for customizing layouts, adding trackers, and navigation tools so you can make a functional and pretty digital planner.
What is the best program to create a digital planner?
xTiles is the best software for making digital planners because of its user-friendly interface, powerful features, and flexibility. It has Collections, interactive elements, and customization options, so it’s good for beginners and experienced planner makers.
How do you make a homemade digital planner?
To make a homemade digital planner, start by sketching your main layout and listing pages in xTiles. Then design and organize your pages using xTiles features, and add navigation tools and interactive elements. xTiles makes it all easy by being an all-in-one platform for design, organization, and customization.
What is needed for a digital planner?
A digital planner needs monthly and weekly spreads, daily schedules, goal-setting sections, and various trackers. xTiles has all the tools to create these elements, text boxes, Collections and interactive features so you can build a full and functional digital planner.